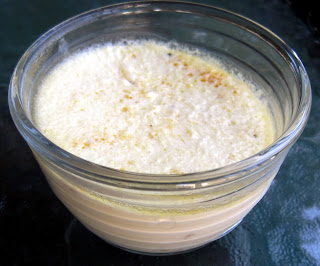
It's been very busy over here... but here's a quick summer treat for your whole food eating child or grandchild. Very easy! Of course, I don't eat much fruit, but I do give it to my toddler. No juice, though! I feel like juice is a highway to diabetes, so I used the whole fruit in this recipe. He eats grain-free and sugar-free like I do, so this is the first time he's had any kind of popsicle. He loved it!
My toddler has not wanted to eat anything lately... won't touch yogurt or an orange for sure! But this... he loved!! He kept saying, "Mmmmm!"
Whole Food Orange Creamsicles for Kids
Makes 4-5 small creamsicles
1 organic orange, peel and seeds removed (try not to lose too much juice)
1/4 cup organic whole milk yogurt (does not need to be exact)
liquid vanilla stevia to taste
vanilla extract if not using much stevia
push-pops or ice pop molds
high power blender
Blend orange in blender until completely liquified. Add yogurt and a few drops of vanilla stevia and taste. Add rest of ingredients and more stevia, if needed, to taste. Pour small amounts in each mold and freeze for 2 hours. Serve on a hot day!!
Thursday, May 23, 2013
Saturday, May 4, 2013
May the Fourth Be With You
My Husband tells me that today is Star Wars Day. (lol). Actually today is my webpage's 4th anniversary! Thanks for being a part of it!
There are new posts coming soon, as soon as I wrap up some singing projects, hopefully in May.
Stay tuned!
Rachel
There are new posts coming soon, as soon as I wrap up some singing projects, hopefully in May.
Stay tuned!
Rachel
Tuesday, February 26, 2013
Easy Collard Greens & Pork Stock
Stock. It's so good for you. I make many kinds of stock: chicken, pork, beef, lamb, seafood. And, I sell some locally. I just bought a beautiful pastured pig from a local farm, and my freezer is full of delicious and good for you pork! To make my pork stock, I use pork bones, some sea salt, black peppercorns, a bay leaf, green onions or onion chives if I have some on hand from my garden, and some odds and ends of vegetable scraps- like onion skins and tops, squash rinds, things like that. I add filtered water and keep it below the boiling point, and I leave the fat on it. So this is what I used to make these collard greens. They were incredible. If you don't have your own pork stock already made, you can simmer a pot of water and pork bone until reduced, and then proceed with the recipe. If yours has very little fat, add some stable fat such as pastured lard, or coconut oil to the recipe. After we ate the greens, we drank the broth. It was spicy and delicious and so many health benefits!!! My husband said he hated collard greens but dinner took way longer than expected, so out of desperate hunger, he tried some... then finished it off. He loved it! THIS is the way to eat collard greens!
If you are still unsure why eating pastured meat is so much better for you than conventional, go here.
Easy Collard Greens, Southern Style
Feeds 4 a a side dish or 2 as a snack
3 cups homemade pork broth with fat
OR
4 cups of water simmered with ham hock or pork bone until a golden color (reduced in half) and a few Tablespoons of stable fat added to it - pastured lard or coconut oil
1/4 teaspoon red pepper flakes, optional. This will make it spicy.
1 bunch of organic collard greens, rinsed well and torn into smaller pieces
Pour broth into a quart pot with red pepper flakes, and add greens on top. The greens will be much higher than the broth, that is ok. Simmer, stirring frequently, until greens reduce enough so that they are in the broth. Keep cooking until soft. Take pieces out and cool to try frequently. When done, drink the broth after or dip in some cheese biscuits! Yum!
Sunday, February 24, 2013
Homemade Vanilla Extract, GMO & Grain Free
CAVEAT: 4/29/13 UPDATE: This did not work. re-trying. :( Sorry! It does make delicious vanilla GMO-free rum though, which my husband is really enjoying right now.
I go through a lot of vanilla extract over here. So, I got a great deal on vanilla beans online (do a search and you will, too!) and made my own. It is so easy! Most people use vodka, but I do not. This is why. First, I do not believe that Celiacs can drink vodka and grain based alcohols. Why? Because I never have been able to. They have always made me sick. The two alcohols that do not bother me are rum and tequila. And guess what? Neither of those are grain based. Vodka is almost always wheat based. Sure, you can buy potato vodka if you want. But, potatoes are still considered grain-like (reactions in body). My second reason is that I am trying to completely cut out GMOs. So I want to stay away from anything that is made from GMO (wheat, potatoes, grains) even if it is denatured and not problem causing for gluten intolerants (which I do not believe). Of course, it is up to you. There is very little vanilla extract in any recipe. I used rum made in Louisiana from Louisiana cane sugar. I am reasonably sure that the cane sugar grown here is GMO free, from the research I have done. So I made more than 1 1/2 pints of vanilla extract for less than $17. Next time, I am going to buy organic vanilla beans! (I wish I had thought of that the first time).
In my picture you can see I forgot to cut the beans to make them less tall. I'll have to do it later. I'll post a picture later to show you the color change!
March 26 note: still not ready. So, at least 6 weeks!!
Homemade Vanilla Extract
makes one 750 ML bottle
1 bottle of cane-sugar rum made in US or Cuba
9 organic vanilla beans, mine were on the small side
Open rum bottle. Slice the vanilla bean pods length-wise and use the knife to scrape out the inside seeds. Scrape the seeds on the knife inside the lip of your rum bottle. Cut vanilla beans in half to make them half as tall. Drop them into the bottle, and try to push the seeds into the bottle as you are doing it. Re-cork the bottle and shake well. Store in a cool dark place for 6 weeks. Don't let the liquid go below the vanilla pods. Refill as necessary. The vanilla beans will last longer than one bottle's worth of rum.
I go through a lot of vanilla extract over here. So, I got a great deal on vanilla beans online (do a search and you will, too!) and made my own. It is so easy! Most people use vodka, but I do not. This is why. First, I do not believe that Celiacs can drink vodka and grain based alcohols. Why? Because I never have been able to. They have always made me sick. The two alcohols that do not bother me are rum and tequila. And guess what? Neither of those are grain based. Vodka is almost always wheat based. Sure, you can buy potato vodka if you want. But, potatoes are still considered grain-like (reactions in body). My second reason is that I am trying to completely cut out GMOs. So I want to stay away from anything that is made from GMO (wheat, potatoes, grains) even if it is denatured and not problem causing for gluten intolerants (which I do not believe). Of course, it is up to you. There is very little vanilla extract in any recipe. I used rum made in Louisiana from Louisiana cane sugar. I am reasonably sure that the cane sugar grown here is GMO free, from the research I have done. So I made more than 1 1/2 pints of vanilla extract for less than $17. Next time, I am going to buy organic vanilla beans! (I wish I had thought of that the first time).
In my picture you can see I forgot to cut the beans to make them less tall. I'll have to do it later. I'll post a picture later to show you the color change!
March 26 note: still not ready. So, at least 6 weeks!!
| Just made: not ready yet! |
Homemade Vanilla Extract
makes one 750 ML bottle
1 bottle of cane-sugar rum made in US or Cuba
9 organic vanilla beans, mine were on the small side
Open rum bottle. Slice the vanilla bean pods length-wise and use the knife to scrape out the inside seeds. Scrape the seeds on the knife inside the lip of your rum bottle. Cut vanilla beans in half to make them half as tall. Drop them into the bottle, and try to push the seeds into the bottle as you are doing it. Re-cork the bottle and shake well. Store in a cool dark place for 6 weeks. Don't let the liquid go below the vanilla pods. Refill as necessary. The vanilla beans will last longer than one bottle's worth of rum.
Thursday, February 21, 2013
Twice Baked Parmesan Crackers
I love to make these crackers. It took me forever to post it because sometimes they just wouldn't crisp right and I just couldn't figure out the cause. The humidity, maybe? Then I discovered if you bake them twice, they are even better. We tried the ones Whole Foods makes and they are delicious but cost $22 a pound! So I made my own, and I like them better. These are so easy to make and my toddler looooves them (no goldfish for him!!). I hope you enjoy this recipe. Please post if you do!
Use real cheese, not the kind of parmesan that comes in a shaker ;)
Twice Baked Parmesan Crackers
shredded parmesan
grated parmesan
parchment paper
metal baking sheet
Preheat oven to 300˚F. On a metal baking sheet lined with parchment paper, spread out enough shredded parmesan to cover the sheet but in a lacey pattern. You want "holes" (like the pattern of lace), so that it is not too thick. Then, fill in the "holes" with grated parmesan, and sprinkle a little all over. Bake for 20- 40 minutes (depending on how thick you made it) or until it is golden brown all over the top. Take out and let cool to room temperature, on the baking sheet. When cool, test to see if you can break off a piece, near the middle: does it come off crisp, or is it bendable? If you are lucky, sometimes one time baking is enough. Otherwise, if it is a little bendy, bake again, at 300˚F for about 20 minutes until crispy. Let cool, break off in pieces, and store in an airtight container. If they get soft, re-toast to crisp them up again.
Sunday, February 3, 2013
Healthy Chocolate Mints
When making some new fat bomb variations, I came up with an icing of sorts on accident, and it suddenly occurred to me that I could make fat bombs in the shape of Andes chocolate mints... it could be like healthy candy. After all, isn't that what "fat bombs" are? For those of you who are coming across this low-carb term for the first time, "fat bombs" are just little healthy bombs of good fat- usually grass-fed butter or virgin coconut oil or something similar mixed with other healthy items- cocoa, stevia, coconut butter or nut butter for instance. They kill carb cravings by giving your brain what it needs- good fats! Your brain is made up of 65% fat, did you know? So here is my recipe, I hope you enjoy it.
Personally, I think a silicone brownie pan is a must for this recipe. But if you don't have that, just carefully line a regular pan (use glass instead of metal if you have it) with parchment paper so that the chocolate does not stick.
Healthy Chocolate Mints
Chocolate:
3 Tablespoons cocoa powder, sifted makes life easier
2 Tablespoons coconut butter
2 Tablespoons grass-fed butter
3 Tablespoons grass-fed cream
2 teaspoons honey (optional)
6 Tablespoons virgin coconut oil
1/4 teaspoon NuNaturals Stevia (if subbing, start with half as much, NuNaturals is less sweet)
1/2 teaspoon vanilla extract
silicone baking pan or parchment paper lined (bottom and sides) glass pan, about 8x8
Prepare your baking pan wither with parchment paper or if silicone, place on a metal cookie sheet to prevent spilling. On low heat in a saucepan, melt cocoa powder, coconut butter, butter, cream and honey until well incorporated. Use a wire whisk if you are having problems with clumping cocoa powder. Once warm and mixed, turn off heat and add virgin coconut oil and stevia. Stir until blended. Add vanilla and stir. Pour half the mixture on the bottom of the pan and make sure it is evenly distributed on the bottom. Place pan (and cookie sheet, if using) inside freezer for 10 minutes or until hardened. Make the filling during this step, and set aside the other half of chocolate.
Filling:
1 Tablespoon coconut butter
1 Tablespoon grass-fed butter
1 & 1/2 Tablespoons grass-fed cream (or 4 & 1/2 teaspoons)
1 teaspoon raw honey (optional)
3 Tablespoons virgin coconut oil
1/8 teaspoon NuNaturals Stevia (if subbing, start with half as much, NuNaturals is less sweet)
a few drops of peppermint oil. I used Young Living Brand. Go slow!
silicone spatula
On low heat in a saucepan, melt coconut butter, butter, cream and honey until well incorporated. Once warm and mixed, turn off heat and add virgin coconut oil and stevia. Stir until blended. Add peppermint oil 1 or 2 drops at a time, tasting after each one, until desired mintiness is achieved. When chocolate in pan is hardened, pour on top with a silicone spatula ready... it will start to harden as it touches the chocolate. You need to make sure it completely covers the chocolate as evenly as possible. Return to freezer for 5-10 minutes (unless it already hardens and you don't need to). Pour the rest of the chocolate from the pot on top. Return to freezer for 10 minutes, then place in refrigerator for 20 minutes. Carefully release onto large wooden board or marble slab if you have one and cut into rectangular pieces with a sharp knife. Place candies into a container and keep in fridge to keep them hard.
Thursday, January 31, 2013
Blueberry Pancake Jam
Makes about a cup. Stores for about a week, but can be frozen.
1 1/2 cups frozen organic blueberries
filtered water
1 Tablespoon arrowroot powder (can use cornstarch but you'll need more, and won't freeze well)
stevia or honey to taste (I have used 1/4 tsp honey)
whisk
blender
flour sifter so starch doesn't clump
sauce pot
glass jelly jar
With blueberries still in the measuring cup, pour enough water in the cup to cover them and let sit 5 - 10 minutes. Pour into blend, and blend until thoroughly mixed. Pour into a pot over high heat until mixture boils. Reduce heat to low and let it reduce to a third or a half. Sift in arrowroot powder and whisk immediately until blended. Sweeten to taste. Pour on pancakes and leftovers can be refrigerated in the glass jar for up to a week.
Wednesday, January 30, 2013
Gluten Free Low Carb Chocolate Chocolate Chip Muffins
Here are some amazingly chocolatey muffins... not very sweet (you can add more sweetness if you like) but very good! Perfect little to-go breakfast with a hard boiled egg.. if you are having some chocolate cravings! It feels totally decadent to eat one of these for breakfast but each one only has about 7 net carbs.
Gluten Free Low Carb Chocolate Chocolate Chip Muffins
makes 6
3 eggs, separated
2 Tablespoons butter or virgin coconut oil, melted
2 Tablespoons cream or coconut milk
1/4 cup erythritol (or 3 Tablespoons sugar sub, or 1/4 cup honey)
1/4 teaspoon salt
1/2 teaspoon vanilla extract, gluten free
1/4 cup cocoa powder
1/4 cup coconut flour (sifted)
1/4 teaspoon baking powder
1/2 of a 3.5 ounce 85% chocolate bar, I used Valrhona, chopped into chips (directions on this page)
Whip egg whites and set aside in fridge or cool place. In a separate bowl, mix egg yolks, melted butter, cream, vanilla, agave, and salt. Stir in cocoa, and erythritol. Combine coconut flour with baking powder and sift into batter, stirring quickly so that there are no lumps. Fold in egg whites (go here for tips on doing this in such a sticky batter). Add chips. Pour into greased muffin tins, the batter should make 6. They won't rise that much, so you can fill each tin to the top. Bake at 375 degrees for 15 minutes. It's okay if the muffins still look slightly dark on the top in the middle of the muffin when you take them out, they will not be undercooked, but will stay moist. Enjoy!!!
Tuesday, January 29, 2013
Gluten Free Pancakes
2013 UPDATED recipe: no agave!
I love pancakes, don’t you? I think this recipe is easy enough to make without getting too crazy with ingredients. You could actually leave out the vanilla and erythritol/sweetener if you wanted to make it even easier. As for milk, you can substitute water or sparkling water (for more volume). I actually used my cultured raw milk, which is like buttermilk. You’ll see in my picture I used blackberries, but any kind of berries will work. You only need a few, so it shouldn’t bother your carbs or G.I.
Now for the syrup… you can use your own judgement. To give you a clue on how natural sweeteners add up, here are some G.I. counts.
Sugar 60 - 65
Pure Maple syrup 54
Honey 58
Coconut Palm Sugar 35
Erythritol 0
Stevia 0
Stevia 0
Sometimes when I want maple syrup, I boil butter and a splash of maple syrup in a pot. I let it boil up and caramelize before pouring just a touch on my pancakes. But do what you feel comfortable with. Some ideas: For truly low G.I., you could melt butter with 2 – 3 berries, and pour it on top and serve with whip cream, instead of using syrup. Smush the berries a bit and it will make a fruit syrup. Blueberry Syrup with xylitol, Strawberries and cream topping, or Blueberry Jam topping. Happy pancaking!
Gluten Free Pancakes
serves 2
ECC per serving: made with 6 TBLSP cream: 1.7 ECC, with milk: 8.75 ECC per serving, with coco milk: 2.75 ECC
2 organic eggs
4 - 6 Tablespoons organic milk, cream, or coconut milk – I used cultured raw milk
2 Tablespoons melted butter or high quality coconut oil
1 cup high quality Almond Flour like Honeyville (or could be grainy)
½ teaspoon baking soda
¼ teaspoon sea salt
1 Tablespoon erythritol (or honey, or a little stevia)
1 teaspoon vanilla extract
high quality coconut or palm oil for pan
a few berries (optional) (adds 3.5g carbs per Tablespoon)
water
Beat eggs until fluffy. Add 4 Tablespoons (¼th cup) milk/cream and melted butter. Add flour, baking soda, salt, erythritol, and vanilla and beat again to incorporate air in mixture. If mixture is too thick, add the other 2 TBLSP of milk. If still too thick, add a little water until it's looser. Heat oil in skillet on medium. Spoon batter into rounds in skillet, trying to spread each one out a bit, so that they are not too thick. Quickly drop a few berries (if using) on each pancake. Turn to lower heat. Pancakes will bubble, then the bubbles will break, leaving holes- this is when you know the pancakes are ready for turning. Make sure the middle is cooked before flipping. Almond flour pancakes brown quite a bit on the bottom so keep your heat low and cook slowly. Flip and they should be cooked through pretty quickly.
Saturday, January 19, 2013
BEST Fat Bombs
I love fat bombs. They really help me stay on track. And, since I have been WAY off track lately, and it's time to start all over, fat bombs are really saving me. What are they? Basically, they are little chocolate (in this case) truffles that are primarily made up of good fat, used to stop cravings for carbs in their tracks. The virgin coconut oil gives you energy, and helps regulate your thyroid and adrenals, which is a bonus. The fats from coconut oil, and especially from pastured grass-fed cow's butter will really satisfy you. Since good fat is good for you, helping your brain and your body, these will actually help you burn fat if you stay away from the carbs.
Why eat grass-fed dairy? Here's a good article, explaining about CLA, the anti-cancer fat only found in dairy from grass-fed (naturally fed) cows. Check it out at grassfedtraditions.com, if you don't know about it!
My first two fat bombs.. chocolate and lemon, were both dairy free, by the way, so if you can't have dairy, go on over to those two posts.
I made these with peanut butter, but I also tried a batch with coconut butter (ground coconut like nut butter, I used Artisana brand which is yummy). Sometimes fat bombs separate in the freezer, leaving a white top to your fat bomb. This happened to my coconut butter version a few days ago, and it was even better... so no worries. I suspect I added 2 extra Tablespoons of coconut oil on accident, when my toddler sweetly distracted me.
I use either mini muffin papers, which I lay inside a tin mini cupcake pan. However, if you have a mini -muffin silicone pan, that is even easier. I like HIC brand, it has no silicone smell/taste to baked goods.
I used NuNaturals stevia, which is half as sweet as other brands. So start with very little and work up to taste- your taste buds might be different than mine. Write down how much you used and which brand (also post here!) so you will remember what you did for next time- then it's faster to make.
Best Fat Bombs Ever
makes around 16
2 Tablespoons grass-fed butter like Smjör or Kerrygold
3 Tablespoons grass-fed cream
1 Tablespoon raw honey (optional)
3 Tablespoons cocoa powder
2 Tablespoons organic peanut butter OR coconut butter
6 Tablespoons virgin coconut oil
2 Tablespoons ground nuts, I used pecans
1 Tablespoon shredded coconut
1/4 teaspoon NuNaturals powdered stevia, or very little of another brand, to taste
1/2 teaspoon vanilla extract
silicone mini-muffin pan or regular with mini paper baking cups or silicone molds
First, if your coconut oil is not at a liquid state, you should melt it without destroying its virgin state. I heat a pan of water with a candy or meat thermometer until it gets to 120˚F. Then, I turn it off and set the jar of virgin coconut oil in it and let it sit until it's melted inside.
In a medium saucepan over low heat, melt buter, cream, honey (if using), cocoa powder, and peanut butter (if using). Use a whisk to mix all together, if necessary. Turn off heat and add in coconut oil, coconut butter (if using), nuts, coconut, and stevia (to taste, start out small). Stir until all mixed in together, then add vanilla. Pour into molds/pan/papers and freeze for 10 minutes (if using a silicone pan, put on a cookie sheet so it won't bend and spill). Then, transfer to refrigerator for 15 minutes. Pop out of silicone molds or pull them out by the cupcake papers and store in refrigerator in a sealed container. Eat whenever you have a carb craving!!
Tuesday, January 15, 2013
"Breaded" Bay Scallops
This is a recipe from a friend that I updated to gluten-free.. this is an appetizer portion for two, but you can easily increase the portion. You may use herbed butter, or just regular butter. I've done both. You can also add a little lemon juice at the end, but I like ours without.
Melissa from Satifying Eats has a new cookbook, that is great! I love it!! I highly recommend it. It is really a complete grain-free sugar-free cookbook, with everything you can think of. For this dish, I used the Bread-less Bread Crumbs from her book. There is a similar recipe on her blog, that I linked to, below (parsley omitted, although sounds like it would be tasty if you have them!).
I apologize for the picture- my camera seems to be needed a battery replaced, it didn't focus correctly and the scallops didn't last long enough for another picture!! They are so tasty!
1/2 lb bay scallops
2 Tablespoons Kerrygold herbed butter or plain butter [grass-fed/non GMO like Kerrygold or Smjör]
splash white wine (optional but yummy. alcohol will likely cook off)
2- 3 Tablespoons Breadless Bread Crumbs from Satisfying Eats
Preheat the oven to 400˚F. In a small baking dish or pie tin, spread around a few thinly sliced pats of butter. You can use a little more than 2 Tablespoons, if you like. Place dish in oven to melt butter. Remove, and add a splash of white wine. Put your scallops in a single layer on top, and stir to get the butter all over the scallops, but keep them in a single layer. Sprinkle the "bread crumbs" lightly on top of the scallops. Bake for 12 - 18 minutes until done - scallops will be opaque, and breadcrumbs golden. Serve immediately.
Let me know if you enjoyed this recipe and any tweaks you made to it, and how it came out! Thanks!!
If you are on Facebook, join the discussions with us! I hope to post recipes more often, but have been very busy lately with singing, teaching, and most importantly... Mommy-ing!!
Melissa from Satifying Eats has a new cookbook, that is great! I love it!! I highly recommend it. It is really a complete grain-free sugar-free cookbook, with everything you can think of. For this dish, I used the Bread-less Bread Crumbs from her book. There is a similar recipe on her blog, that I linked to, below (parsley omitted, although sounds like it would be tasty if you have them!).
I apologize for the picture- my camera seems to be needed a battery replaced, it didn't focus correctly and the scallops didn't last long enough for another picture!! They are so tasty!
| Half the recipe - a generous serving! |
Gluten Free "Breaded" Bay Scallops
serves 2-3 as an appetizer1/2 lb bay scallops
2 Tablespoons Kerrygold herbed butter or plain butter [grass-fed/non GMO like Kerrygold or Smjör]
splash white wine (optional but yummy. alcohol will likely cook off)
2- 3 Tablespoons Breadless Bread Crumbs from Satisfying Eats
Preheat the oven to 400˚F. In a small baking dish or pie tin, spread around a few thinly sliced pats of butter. You can use a little more than 2 Tablespoons, if you like. Place dish in oven to melt butter. Remove, and add a splash of white wine. Put your scallops in a single layer on top, and stir to get the butter all over the scallops, but keep them in a single layer. Sprinkle the "bread crumbs" lightly on top of the scallops. Bake for 12 - 18 minutes until done - scallops will be opaque, and breadcrumbs golden. Serve immediately.
Let me know if you enjoyed this recipe and any tweaks you made to it, and how it came out! Thanks!!
If you are on Facebook, join the discussions with us! I hope to post recipes more often, but have been very busy lately with singing, teaching, and most importantly... Mommy-ing!!
Saturday, January 12, 2013
Gluten Free Sugar Free Banana Cream Pie (so easy!)
This is not a traditional banana cream pie. There is no custard or long period of stove cooking. It's quick, light, and easy. It has an amazing mouth feel. Sometimes you just have to have bananas. I know they are not low-carb, but I do believe they are nutritious and nice for a once in a while treat.
This pie has no sugar at all and is only made with stevia. If you think you dislike stevia, I ask you to try it again. It really is the best choice for sweeteners. If you can handle a little corn (maltodextrin), NuNaturals is completely free of any bitter taste, although less sweet, so you'd need to use twice as much (1/2 teaspoon for 1/2 cup sugar). Pies are the easiest desserts to make with stevia since they don't rise, like cake. This pie is low sweetness. You can increase the stevia from a 1/2 teaspoon to up to one teaspoon, and you could even add honey or erythritol to the cream cheese mixture, if you want to make it sweeter. I added the insides of a small vanilla bean once, too, and it was delish! (I still used the extract).
Here's a banana cream pie that you can give your children and feel good about... use ripe bananas- with little brown dots on the skin- they have a lot less starch, and they taste and digest better. Please comment and let me know what you think! I love comments on this page, too!
A big thank you to all my readers, I am so glad you like my recipes and we can all journey into better health together!!!
Rachel
Gluten Free Sugar Free Banana Cream Pie (so easy!)
crust: chocolate pie crust link, regular pie crust link (I like chocolate, but you may not...)
filling:
16 ounces (2 bricks) organic cream cheese (or even better, cultured raw cream cheese from a local farmer), softened
1 1/2 cups heavy cream
1/2 teaspoon vanilla extract
3 - 4 ripe bananas: 2 mashed, the rest sliced
1/2- 1 teaspoon NuNaturals Stevia or start with 1/4 teaspoon of another brand and work up to taste
Make one of the pie crusts that I link to above. When crust is cooled, place one layer of sliced bananas on the bottom.
In a medium sized bowl, whip cream to soft peaks. Add stevia and vanilla, mix well, and set aside in fridge. In another bowl, whip cream cheese and mashed bananas. Fold in the whipped cream mixture. Pour into cooled pie crust lined with banana slices and chill for about 30 minutes to an hour. You can garnish with banana slices, chocolate curls or chocolate cookie crumbs.
Tuesday, January 8, 2013
Coffee Cake!
The one I made today (in the pic) was the kid-friendly recipe so it is a darker color because of some darker honey I used. I used coconut milk and expeller pressed coconut oil. In the topping, I used mostly pecan meal + some ground walnuts for a little more crunch. I used Penzey's brand cake spice... which is a mix of cinnamon, star anise, nutmeg, allspice, ginger, and cloves. I love the taste of this spice. If you don't have cake spice, just use more cinnamon.
TIP: If you are making this with coconut oil, make sure your egg yolks are room temperature OR beat quickly the egg yolks and oil first so that it doesn't harden back up on you and mess up your batter. This has happened to me countless times, then I have to wait for the whole batter to get above 72˚F to get it blended well.
Gluten Free (Dairy Free) Coffee Cake
6 Tablespoons butter, melted and slightly cooled (or coconut oil)
6 eggs, separated
2 Tablespoons whole milk or coconut milk
½ cup erythritol or 3 Tablespoons honey
¾ teaspoon NuNaturals Stevia or half as much different brand
½ teaspoon cake spice (or ½ teaspoon more cinnamon)
½ teaspoon cinnamon
½ teaspoon vanilla
1 teaspoon sea salt
½ cup coconut flour
½ teaspoon baking powder
Filling:
mix together:
½ cup ground nuts or nut flour or mixture
2 teaspoons cinnamon
2 teaspoons coconut palm sugar
½ teaspoon NuNaturals stevia or half as much other brand (to
taste)
Grease well a 9 x 5 bread pan and line the bottom with
parchment paper. Whip egg whites
in a clean and dry bowl until soft peaks form, set aside.
In a separate bowl, blend together melted butter or coconut
oil & egg yolks. Add milk,
erythritol, stevia, cake spice, salt, and vanilla and mix ingredients well. Combine coconut flour and baking soda
and sift into ingredients, while mixing well to ensure no lumps. Add a 1/3rd of
egg whites to soften the batter, then fold in rest. Pour a small amount of batter in the prepared pan to cover
the bottom, then sprinkle half the filling. Pour the rest of the batter. Add the rest of the filling on top. Bake at 400 degrees F
(205 C) for 17 - 25 minutes. Cool.
Thursday, November 15, 2012
Savory Winter Squash Tartlets
These savory winter squash tartlets could be made with pumpkin, butternut squash, any kind of darker flesh winter squash. Be creative! I took a chance on two gorgeous squash that were unusual, and they were absolutely amazing. I mixed them together in this recipe. You could dry a dash of nutmeg.. I wanted to try it but I couldn't find mine.
This is the perfect side dish for Thanksgiving and is easy to make ahead! I made them mini-cupcake and regular cupcake sized. You can make this with cupcake liners in mini-cupcake size, regular cupcake size, or make a large one. Just watch cooking times.
This crust is a variation of Elana's from The Gluten-Free Almond Flour Cookbook. I changed the oil to butter/coconut oil and doubled the onions. I like it with butter in this recipe. If you are dairy free, use coconut oil. I am sure you could replace the cream in this recipe with coconut milk. If you try it, let me know how it turns out.
**To roast your squash, first slice off ends (stem), then slice in half from top to bottom. Poke a few holes through the rind with a fork or sharp knife to release steam. Pour enough water in a cookie sheet or shallow baking dish (latter is safer) to fill about a half inch, then place squash flesh side down and roast in a pre-heated oven on 400˚F until soft, time depends on variety and size. Cool, scoop out flesh, and process in a food processor until smooth.
Savory Winter Squash Tartlets
1 savory crust recipe (see below)
2 & 1/2 cups pureed squash/pumpkin
5 eggs (I used farm eggs- they are between medium and large sized
1/2 cup cream
2 teaspoons sea salt
1/8 teaspoon or dash ground white pepper (optional)
Preheat oven to 375˚F. Place the squash in bowl and blend, adding eggs one at a time. (TIP: Always crack your eggs in a separate bowl first so you don't get eggshells in mixture). Add cream, salt & pepper (if using). Bake 12-17 minutes for small size, around 20 minutes for regular size & please post if you make one big one, how long it took you!
Almond Flour Savory Crust
adapted from the Gluten-Free Almond Flour Cookbook by Elana Amsterdam (buy it!!)
1 1/2 cups blanched almond flour (any kind)
1/2 teaspoon sea salt
1/2 teaspoon baking soda
2 tablespoons minced onions, shallots, or scallions
4 Tablespoons butter, or coconut oil
1 tablespoon water
cupcake liners, small or large - depending on your tins:
cupcake tins, small or large
Preheat the oven to 350 degrees. Line your cupcake tins with liners.
Melt in a small saucepan on very low heat your butter, or coconut oil (if needed), until just melted, then remove from stove top.
In a large bowl, combine the almond flour, salt, onions, and baking soda. Add the butter and water and mix together. Make small teaspoon or tablespoon sized balls (mini/regular sized tins respectively) and press them with your thumb into the bottom of each liner. (see pic below)
Bake for 5 - 10 minutes until golden brown. Remove and let cool.
Wednesday, November 7, 2012
Cocoa Chocolate Ice Cream
| Cocoa Chocolate Ice Cream with Peanut Butter Cookies |
I thought it would be a good idea to post a chocolate ice cream recipe using just cocoa powder, instead of a mix of cocoa and an 85% chocolate bar... in case you are reading this post in the middle of the night, wanting a low-carb ice cream, but have no chocolate on hand! Because, that has totally happened to me.
This recipe is a great way to use up your soured raw milk. You won't taste the sour in the chocolate mix, and since it is raw, that sour milk is so good for you- extra probiotics! If you have regular milk, that works too.
Remember that when using xylitol, it is best to limit your portions, until you are sure how much of it your body can stand without getting a laxative effect. I made Peanut Butter Cookies (sub for sugar!) and put this ice cream between them.
Chocolate Ice Cream
1/2 cup cocoa powder, sifted
1/2 cup birch xylitol
1/4 teaspoon good tasting stevia (1/2 teaspoon if you use NuNaturals)
1 cup [organic/raw] milk (raw soured milk is great for this!)
2 cups [organic/raw] cream
2 fresh pastured eggs (this is important, because they will be raw in the recipe)
2 teaspoons vanilla extract
pinch salt
ice cream maker
In a medium sized saucepan, combine a half a cup of milk, cocoa powder, and birch xylitol. Stir until throughly mixed and melted together. Depending on how large the xylitol crystals are, this might take a while. Set aside and cool.
Whisk eggs i a large bowl until fluffy. Add stevia, vanilla, and salt and mix well. Pour in 1/3 of the chocolate mix (esp if it is still warm) and mix well. Add the rest and mix. Then add the other 1/2 cup of milk and the cream and stir. Refrigerate for about 2 hours.
When mixture is cooled, use in your ice cream maker to make chocolate ice cream. When it is done, transfer to freezer to harden.
Wednesday, October 31, 2012
Gluten Free Low Carb Peanut Butter n Jelly Muffins!!
I love Almond Flour for crusts - pies, quiches, and pizzas. I also like it for scones and cookies. But for muffins and cupcakes, I am sticking to coconut flour. It's lower carb (well, you use less flour) and I find it to be fluffier. Plus it's a LOT cheaper (let's hear an AMEN to that!) - especially since one 16 ounce $8 bag will last so long. My almond flour is about $30 for 5 LBS.
Now. I did not fold in the egg whites separately for this, because the peanut butter is so sticky, it didn't seem to make a difference. I think you'll get a half muffin extra if you want to try... but I achieved basically the same result by just beating the eggs one at a time - in this recipe at least.
This recipe is just an adaptation of Bruce Fife's peanut bitter muffins in the book Cooking With Coconut Flour, which you must buy immediately. Seriously. Also, his wife has a wonderful blog & Facebook page. This can also be made GFCF/dairy free.
Gluten Free Low Carb Peanut Butter & Jelly Muffins
based on a PB muffin recipe by Bruce Fife in Cooking With Coconut Flour
Muffins:
3 eggs
1 TBSP coconut oil or butter, melted
5 TBSP erythritol or sugar sub
1 TBLS honey (optional)
1/4 cup natural organic peanut butter
1/4 teaspoon salt
1/4 teaspoon vanilla
1/4 cup sifted coconut flour
1/4 teaspoon baking powder
Filling:
2 TBSP all natural organic peanut butter
2 TBSP sugar free strawberry preserves
Preheat the oven to 400 degrees and lightly grease a muffin tin for 6 muffins. Too much oil in the tins will cause these muffins to brown too much on the outside.
In a medium sized bowl, blend the eggs, one at a time. Add melted butter/oil, erythritol, honey, peanut butter, salt, and vanilla. Combine coconut flour and baking powder in a sifter, and sift into batter, stirring in well.
Pour into muffin tin, enough to make 6 muffins. Bake for 10 minutes, watching carefully. You may need to cook a little longer but be careful of it browning too much on the outside. Cool in muffin tin.
Mix the peanut butter and jelly in the filling together with a spoon until thoroughly mixed.
Cut out a little hole in the middle and top of your muffins (sorry this pic didn't turn out that
Sunday, October 21, 2012
Low-Carb Gluten Free Peanut Butter Pie
This is my husband's favorite pie. It's one of mine too. If you are GAPS or peanut-allergic, then try cashew butter in this recipe, and post and let me know how it turns out!
I like mine with graham cracker crust and chocolate on top. However, if you want a chocolate cookie crust, you can go here. And, it is just as yummy without the chocolate on top.
I am re-posting this, because my carb counts were totally off last time. I cannot use a carb counting program to save my life. I have to do this by hand and check the nutritional info on each package.. takes forever! Sorry there aren't more carb counts on my other posts.
I have also made these into individual pies, just by pressing the dough into cupcake papers, in a cupcake pan, then following all the directions the same way. It made 16.
CARB COUNTS: 1/16th slice: 2.9 effective count carbs. Entire Pie: 46.6 ECC. Entire "graham cracker crust": with honey: 15.6 ECC (without honey: 10 ECC). Entire Filling w/erythritol: 18.5 ECC. Topping for entire topping: 12.5 with Lindt bar.
Low-Carb Gluten-Free Peanut Butter Pie
Serves 16, 2.9 ECC each slice
Graham Cracker Crust:
¼ cup ground peanuts
¾ cup Almond meal/flour – any brand or make your own
1/4 teaspoon Stevia Powder (1/2 teaspoon NuNaturals
brand)
1/16 scant teaspoon cinnamon
Pinch sea salt
1 teaspoon raw organic honey (optional)
4 Tablespoons butter
Preheat oven to 350 degrees. Mix dry ingredients. Melt butter and honey on low heat, and mix. Spread
by patting the bottom of a 9 – 10” springform pan, or pie pan with a fork, and
patting with fingers, making as thin as possible. Bake 9-12 minutes until lightly browned. Cool completely.
Filling:
6 oz. cream cheese, softened
¼ cup organic whole milk
1 cup smooth natural Peanut Butter, made of peanuts and salt only
1 cup heavy cream, whipped
½ teaspoon Nu
Naturals stevia or ¼ teaspoon another brand (or use an extra 1/2 cup of sugar sub)
½ cup erythritol or coconut palm sugar or double the stevia
1/2 teaspoon vanilla extract
Cream together cream cheese, stevia, and erythritol. Add
milk, vanilla, and peanut butter and mix. Fold into whipped cream. Fill crust, cover, and refrigerate
until set, an hour or two.
Topping:
This topping is to cover
the entire pie. You can make less if you want to just put a little chocolate on
top.
3.5 oz 71% - 85% cocoa chocolate bar, Lindt has less carbs
1 Tablespoon high quality expeller pressed coconut oil
After pie is set, melt ingredients slowly over low heat in a
heavy saucepan. Cool until only warm and
pour over cool pie crust. Return to refrigerator for another hour.
Tuesday, October 9, 2012
Easy One Pan Roasted Chicken & Green Bean Dinner
I just love easy dinners. I tried this one out for a birthday, which I managed to pull off by making everything during my son's naptime (which was not longer than 1.5 hours today, unfortunately)... which included a pie so this doesn't take too long to assemble.
I recommend using a stoneware dishpan for this, if you have one, as it makes chicken taste better.
One Pan Chicken & Green Bean Dinner - gluten-free & low-carb, of course!
serves 3 to 4
1 four lb whole chicken, pastured (why?)
1.5 lbs fresh green beans, trimmed of stem ends
1/2 cup small mushrooms, any kind, sliced in fours
1 medium onion, diced
4 cloves of garlic, chopped
s&p
about 3 tsp dried thyme
generous amounts of butter and/or expeller pressed coconut oil
Preheat oven to 450˚F. In the bottom of the pan, place string beans, mushrooms, onions, and garlic with about 1-2 Tablespoons of oil or butter. Sprinkle with salt, pepper, and about 2 teaspoons of dried thyme. Place in oven for a few minutes until oil/butter melts, then remove. Stir all together to coat as much as possible all the vegetables. Place your chicken on top, breast side down. Sprinkle with s&p, and a little more thyme. Slice pats of butter all on top. Bake for 15 minutes, then baste the chicken with juices from the bottom of the pan, and make sure all the vegetables are also basted and not dry. Turn heat down to 375˚F and continue cooking with this formula in mind: 20 minutes per pound of meat (not including the 15 minutes of browning you already did). So, a 4 lb chicken = 1 hour and 20 minutes more (80 min). Baste every 20 minutes. How to tell if done: an instant-read thermometer reads about 165 to 170° when inserted into the thickest part of the thigh and juices run clear (not bloody/pink spots). It should be very brown, not just light brown on top. Let sit for 10 minutes without cutting when you remove it from oven.
Thursday, August 23, 2012
Low Carb Gluten-Free Lemon Poppy Seed Muffins
Lemon poppy seed muffins are my favorite... so I made these with coconut flour.. very good! I hope you enjoy them.
Lemon Poppy Seed Muffins
makes 6, 1.7 net carbs each
3 eggs, separated
3 Tablespoons melted organic butter or high quality coconut oil
½ teaspoon NuNaturals stevia powder
(or ¼ teaspoon SweetLeaf or any other brand)
2 Tablespoons Erythritol
2 Tablespoons fresh squeezed organic lemon juice
makes 6, 1.7 net carbs each
3 eggs, separated
3 Tablespoons melted organic butter or high quality coconut oil
½ teaspoon NuNaturals stevia powder
2 Tablespoons Erythritol
2 Tablespoons fresh squeezed organic lemon juice
1 Tablespoon fresh organic lemon zest
¼ teaspoon vanilla extract
¼ teaspoon baking powder
¼ teaspoon vanilla extract
¼ teaspoon baking powder
1 Tablespoon poppy seeds
flour sifter
muffin tin
Preheat oven to 400 degrees F. Cut out parchment paper circles to fit in bottom of muffin tins. Grease muffin tins & papers well with either coconut oil or butter and set aside.
Separate eggs. Whip the egg whites in a clean dry bowl until soft peaks form and put aside.
In another bowl, mix together egg yolks, melted butter, stevia, erythritol, salt, lemon juice, vanilla and lemon zest. Combine coconut flour, baking soda, and baking powder in the sifter and sift into batter, mixing well. Stir in poppy seeds. Fold egg whites into batter. Immediately spoon batter into muffin tin, filling to the top. They won't rise much. Bake for 13 - 16 minutes.
Monday, August 20, 2012
Fast & Yummy Pizza!
I recently came up with this pizza crust recipe. It is so fast & easy, and I love it! It is, of course, gluten free and low carb. I also make this yummy, easy, and cheap pizza sauce (even organic, it is still cheap). This time, I just bought sliced mozzarella instead of the fresh... I had them slice it a little thicker than "medium" and it was perfect. I had almond flour at home (I buy it in bulk). At the store, I picked up parmesan cheese, 1/4 lb sliced pepperoni & 1/2 lb sliced med+ thick mozzarella - both from deli, and one small can of organic Muir Glen tomato paste (about $1.50). Muir Glen brand has no BPA in the can lining, by the way. I find this to be a much less expensive gluten-free crust, if you get a good price on almond flour.
For the pizza crust, you can roll it between two pieces of parchment paper, or you can smash it down with your fingers on one sheet. The first time I made it, that worked fine. The second time, it was stickier, so I used a small piece of parchment paper between my fingers and the crust for pressing. I just hate rolling dough, but it's up to you!!
You all know that I do not cook with olive oil! If you REALLY miss the taste of olive oil, then I suggest you drizzle it over your pizza after you take it out of the oven. Otherwise cook with a stable oil like coconut or palm, so that you are not eating rancid olive oil and introducing free radicals into your body! I use expeller pressed coconut oil, which has no taste.
Yummy, Fast, & Cheap(er) GF LC Pizza
Pizza:
Crust as follows
Sauce as follows
Sliced Mozzarella cheese
Toppings (I used pepperoni!)
Crust:
1 cup almond flour1/3 cup parmesan cheese, grated
1/2 teaspoon salt
1 small egg (this is easy for me, I use farm eggs. 1 small egg is about 2 teaspoons shy of 1/4 cup blended egg)
2 teaspoons high quality coconut oil, butter, or pastured lard
parchment paper
cookie sheet
Mix the dry ingredients in a medium sized bowl. Make a well (a hole in the middle of the dry ingredients in the bowl) and add wet ingredients, then mix all together.
Place parchment paper over cookie sheet. Press dough into pizza crust form on top of parchment paper. If sticky, use another small piece of parchment paper between your fingers and move it around; or a whole piece on top and press; or transfer to countertop and use a rolling pin.
Bake at 350˚F for about 10- 12 minutes until golden brown.
Remove, top with pizza sauce (recipe follows, you can make it while it is baking), mozzarella cheese, and toppings and return to oven with broiler on to melt pizza and crisp your pepperoni (if using).
Pizza Sauce:
1 small can tomato paste (organic)
2 cloves garlic, sliced thinly lengthwise
sea salt
dried basil, oregano, thyme to taste: my ratio is 2 pinches of basil & oregano to 1 pinch of thyme
high quality coconut oil
filtered water
Fry garlic in oil over medium-high heat until golden brown, stirring constantly. Add tomato paste and continue to stir constantly until it loses it's bright color. Turn heat down and add a few teaspoons of water at a time, until you get the thickness you desire. Add sea salt and seasonings to taste. remove from heat, follow directions above.
Subscribe to:
Posts (Atom)